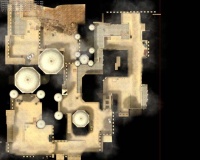
Level Overviews
Some games or mods (such as ![]() Counter-Strike: Source and
Counter-Strike: Source and ![]() Day of Defeat: Source) have a mini-map mode, that shows a level overview and projects players and objects on that map. An overview map is an image made from in-game screenshots and must be created once a new map is finished.
Day of Defeat: Source) have a mini-map mode, that shows a level overview and projects players and objects on that map. An overview map is an image made from in-game screenshots and must be created once a new map is finished.
* Making a mini-map for Counter-Strike: Global Offensive
Make the raw overview image
- Start the game. Click Options and switch to the Video tab. Change Resolution to "1280x1024" pixels and the Aspect Ratio to "Normal".
- Load the new level with the map
<mapname>console command and enable"sv_cheats 1". - Join the Spectator team.
- Bind the "screenshot" command to a key, etc.
"bind f12 screenshot"using the console. This is important, as using the default screenshot key (F5) will take a compressed JPEG rather than a raw TGA.
- Remove any HUD elements with console commands
"cl_drawhud 0"and"hidepanel all". - Remove disturbing world effects like skyboxes (
"r_skybox 0"), fog ("fog_override 1"and"fog_enable 0"), props (optional:"r_drawstaticprops 0"), etc. - Move in spectator mode to a position where you can see the whole level from above.
- Switch to orthographic mode with the console command
"cl_leveloverview x", where x is the scale factor. - Set
"cl_leveloverviewmarker 1024"to show a red helper line on the right. You will need to briefly togglecl_drawhud 1, line it up, and then toggle the HUD off again. - You can move around while cl_leveloverview mode is on. You are still in spectator mode and moving, so move the arrow keys to change the position. Now change scale so the map fits into the square defined by the red line. The right edge of your map should be on the left of the red line, anything to the right of the red line will be chopped off in a later step. Check the attached screenshot to see how this step looks in
de_dust2running under Counter-strike:Source. - The current projection data (position and scale) will be updated in the console, eg "Overview:
scale 6.00, pos_x -2651, pos_y 4027". - Once everything is perfect, take a screenshot (using the key you bound to "screenshot") and write down the projection data values. You will need them in a later step.
No red line?
If you don't see the red line appear at step 9, make sure you have set cl_drawhud 1 (turn this off again before taking the screenshot though).
After this, if you still can't see the line, you may want to try starting over but use 1024x768 (or alternatively 1440x1080*) resolution instead of 1280x1024. Set "cl_leveloverviewmarker 768".
Create the overview material
- Close the game and open the screenshot in an image editor. You will find it in
<game dir>\screenshots. Crop the image horizontally, so that the horizontal resolution matches the vertical resolution (leaving only the left side). - Modify the image as you see fit, perhaps adding an alpha channel to remove unused areas.
 Tip:If making a minimap for a
  Day of Defeat: Source map, consider desaturating the image to sepia. Not only will this improve period authenticity, it will also improve the accuracy of the DXT compressor, minimizing blocky compression artefacts without requiring an uncompressed VTF!
 - Resize it so that its dimensions are a power of two. 1024x1024 is a good choice, assuming that your image starts off larger than that!
- Save your image in a lossless format (e.g. PNG or TGA) and create a material with it. You can use this template for the VMT:
Creating the VTF
When importing the TGA into ![]() VTFEdit Reloaded (or your VTF creator of choice), make sure to have texture format set to DXT1, with mipmap generation enabled and filter set to Box.
VTFEdit Reloaded (or your VTF creator of choice), make sure to have texture format set to DXT1, with mipmap generation enabled and filter set to Box.
In the texture flags, enable Clamp S, Clamp T, and No Level of Detail. This will prevent the border pixels from stretching and looking horrible, and ensures that it won't be a blurry mess if the user
Don't forget to save to whatever filename $basetexture pointed to in the previous section.
Create the overview script
Finally, create a text file called <mapname>.txt in <game dir>\resource\overviews\. This file will define the precise numbers needed to align the overview:
<mapname>
{
	material	overviews/mapname	// texture file
	pos_x		-2651			// X coordinate
	pos_y		4027			// Y coordinate
	scale		6.0 			// scale used when taking the screenshot
	rotate		0			// (optional) map was rotated by 90 degrees in image editor
	zoom		1.3			// (optional) optimal zoom factor if map is shown in full size
}
