Adding chapters to your mod
| Skill Level
This tutorial expects you to have this amount of knowledge within the topic to follow along smoothly. | |||||
|---|---|---|---|---|---|
| Novice | Familiar | Competent | Proficient | Expert | |
Chapters are used to split single-player mods down into manageable chunks. They give your story more structure and allow players to jump into the game half-way through if they so desire. They can also be used to control which background maps/images are displayed.
Adding chapters to your mod is a little complicated, because you need to modify a number of files in order to add new chapters.
Scripts
Registering a chapter
Create <mod>\cfg\chapter1.cfg. This will create a chapter, and contains the console commands that the game will run when it is started. Typically just:
map <first map of the chapter>
Do this for all your chapters.
Localising names
Create (or open, if it exists already) <mod>\resource\<mod>_english.txt (or _french, _japanese, etc). This is your mod's localisation file, where you write the unicode titles for your chapters.
Yours should look something like this:
lang
{
	Language "English"
	Tokens
	{
		modname_Chapter1_Title	"Chapter 1 title"
	}
}
If there are existing tokens in the file, don't remove them. Just add yours somewhere.
In Notepad's "Save As..." dialogue this is called "Unicode".
In Notepad++, in Toolbars > Encoding, this is called "UCS-2 LE BOM".
Fixing on-screen titles
<mod>\scripts\titles.txt defines what appears on-screen when a new chapter starts.
Find the "chapter titles" section and modify it like so:
//CHAPTER TITLES

$fadein 0.01
$holdtime 3.5
$position -1 0.58

CHAPTER1_TITLE
{
#YourModName_Chapter1_Title
}
This file should be saved as normal ANSI.
Images
Thumbnails

You need to create thumbnails for each of your chapters. They should be in <mod>\materials\vgui\chapters\ and named chapter1, chapter2, chapter3 etc.
$basetexturetransform if you use high resolution.materials\gamepadui\chapter#.vtf, and they are in higher "2048x1024" resolution.nomip and nolod.
Disabling mipmapping are not required for Gamepad UI thumbnails.
Your material should look something like this:
Backgrounds
<mod>\scripts\chapterbackgrounds.txt ties background maps and images to chapters. A background will not be used until the chapter it is associated with has been unlocked (see next section).
Here is what it might look like:
chapters
{
	1	"my_background01"
	2	"my_background02"
	3	"my_background03"
}
Each value should be the name of a map in <mod>\maps\ (unless you don't want background maps at all) and a material in <mod>\materials\console\. It's okay to omit a chapter.
See Menu Background Map for more details.
Maps
Unlocking chapters
By default, all chapters except the first start off locked. Unfortunately, Valve's not-terribly-good method of unlocking requires your maps to have the same names as theirs!
You can work around this issue by starting your mod off with all chapters unlocked (set sv_unlockedchapters to the number of chapters your mod has in <mod>\cfg\modsettings.cfg). To actually unlock chapters, you will need to edit your mod's code, or hack it within maps. The latter method is not recommended unless you are modding a game such as Portal that does not provide code.
Equipping players
Players who start a new game at a chapter half-way through your mod will drop into the world without any items. To equip them with the weapons and other goodies they are supposed to have, use a logic_auto's OnNewGame output to spawn a point_template.
The map list
This is not necessary but is used to easily find the names of maps without quitting and relaunching the game.
Create <mod>\maplist.txt and list of maps that your mod will use. For example:
Map1
Map2
Creating chapters with XBLAH's Modding Tool
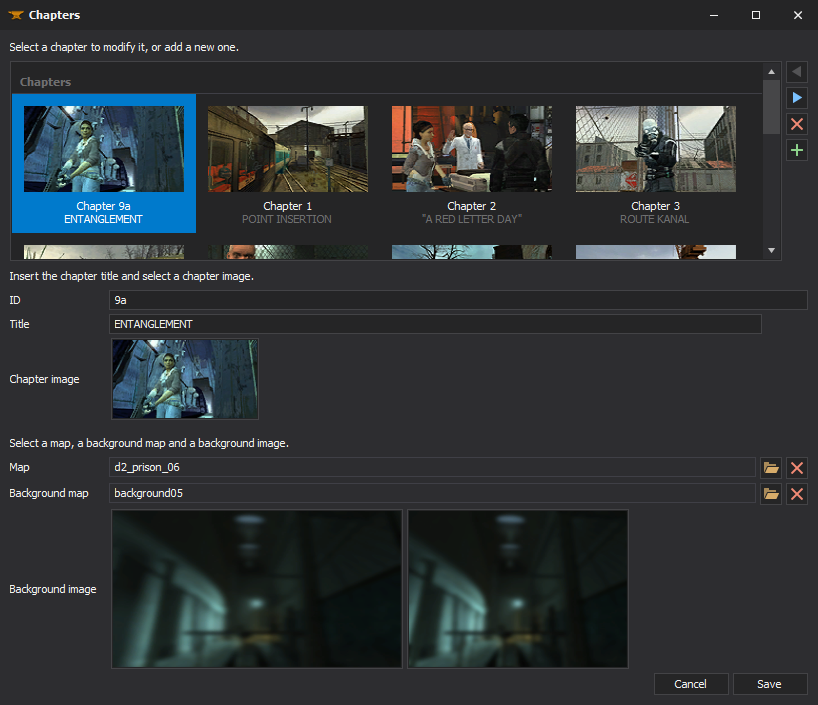
Chapters for single-player games can be created with ![]() XBLAH's Modding Tool through an UI. The modder can easily create new chapters, select the chapter images, chapter background images, the first map of the chapter, the background map, and the tool will do the dirty work of creating the required vtfs, vmts and scripts. It gives the option to automatically blur the background images, so the modder can just take a screenshot of the background map and the tool will apply the usual blur. This replaces the need of saving VTFs, creating chapter images with weird proportions, and so on.
XBLAH's Modding Tool through an UI. The modder can easily create new chapters, select the chapter images, chapter background images, the first map of the chapter, the background map, and the tool will do the dirty work of creating the required vtfs, vmts and scripts. It gives the option to automatically blur the background images, so the modder can just take a screenshot of the background map and the tool will apply the usual blur. This replaces the need of saving VTFs, creating chapter images with weird proportions, and so on.
Where to find it
This can be accessed within the tool through Mod > Chapters.
How to use it
You can insert a new chapter by clicking ![]() button.
button.
Select a chapter ID (Example 1, 2, 3, or A, B, C, etc) and a chapter title. Right click the picture box next to the Chapter Image label and select a screenshot to show up in the New Menu window. Right click the picture box next to the Chapter Background label and select a screenshot to show up as the menu background (or as the loading screen if a background map is set). Select the map that will load when the user selects that chapter, and, optionally, select a background map.

