Alien Swarm Level Creation/Your first Alien Swarm map
This document is intended to be a starting point for Alien Swarm mapping using Hammer. You will be able to create this map with zero knowledge. Mapping for Alien Swarm is very similar to mapping for any other Source Engine game. It does a few things different, but the core structure is as simple and easy to learn. If you haven't already, it's recommended that you read Your First Map to get a good understanding of hammer. You can download the map at the end of this tutorial.
Contents
- 1 Go to the "Alien Swarm" bin in your files
- 2 Start the editor
- 3 Start a new map
- 4 Your first block
- 5 Adding a player
- 6 Adding a functional door
- 7 Lights
- 8 Objectives
- 9 Spawning aliens
- 10 Adding a structure_seal
- 11 Checklist and last adjustments
- 12 Compiling the map
- 13 Download the tutorial map
- 14 See also
Go to the "Alien Swarm" bin in your files
Here you can find the hammer tool to get started, if you use the SDK route, it doesn't work as well, or at all!
Start the editor
Start up Hammer World Editor (it might take some time to load).
Start a new map
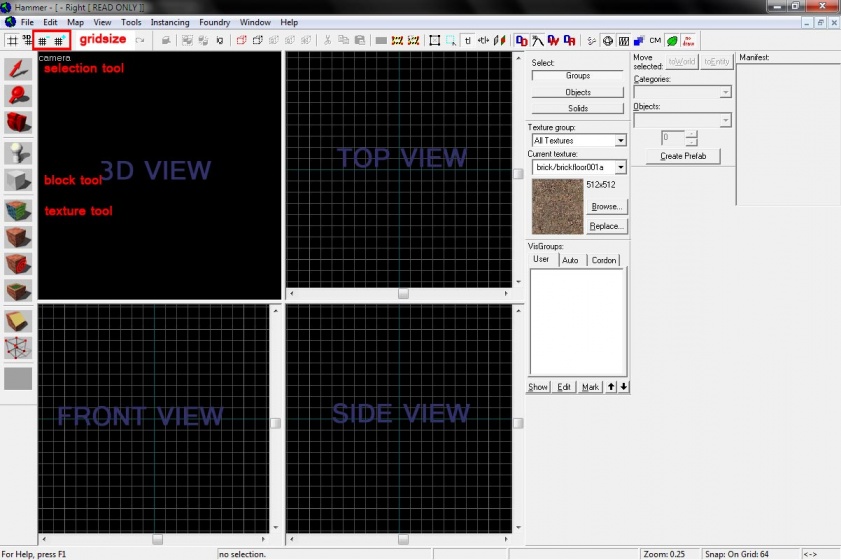
Click on File then New to start creating a new map. The editor will look something like this:
Editor basics
A brief introduction to the basics. Browse the Hammer category for more info on the editor or skip to next section if you are already familiar with the interface.
The views
Each view will show graphical representations of your map. Move your mouse over the top left corner of each view and click on the label to change its perspective. Default values are:
- Top left is the 3D view. Hover your mouse over it and press Z to start moving freely inside this view (using your mouse and the W A S D keys).
- Top right is the top view.
- Bottom left is the front view.
- Botom right is the side view.
This covers everything that is going on in your map. Make sure your 3D view is set to textured, for this click on the top left corner of the view and select 3D Textured. This way you see textured models in the 3D view instead of wireframes, for example.
Basic tools
 Selection tool: Use it to select any kind of elements from your map.
 Block tool: Use it to create three dimensional blocks called brushes.
 Texture tool: Use it to change your brushes textures.
 Entity tool: Use it to insert entities (players, lights, etc.) into your map.
The grid
At the top left of the screen you will see the grid menu, from here you can increase or decrease the grid size.
Other tips
- Save as often as you can. If you mess something up you can load a previous version. Use Ctrl + S for saving.
- You can undo your actions. For example if you marked several objects and the accidentally clicked somewhere else you can undo this and have the objects marked again. Use Ctrl + Z for undo.
Your first block
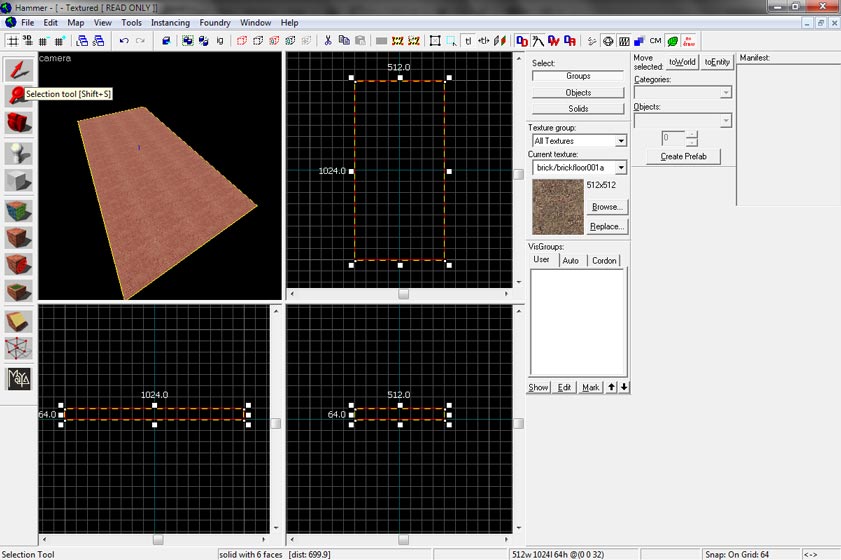
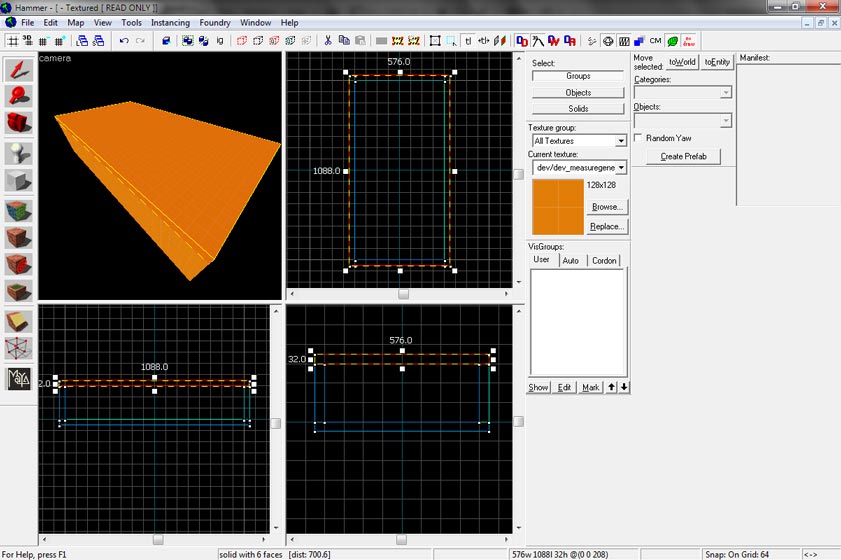
Click on the block tool and draw a rectangle of 512 * 1024 in the top view. You can release the mouse and adjust its size if necessary. Then, press ↵ Enter or rightclick it and select Create Object. This will convert it into a solid object know as brush. If you do not do that last step, the brush would not be created.
Textures
Click on the selection tool and make sure you have selected your brush. If it turns red, it's selected.
Then click on the texture tool:
Now click Browse:
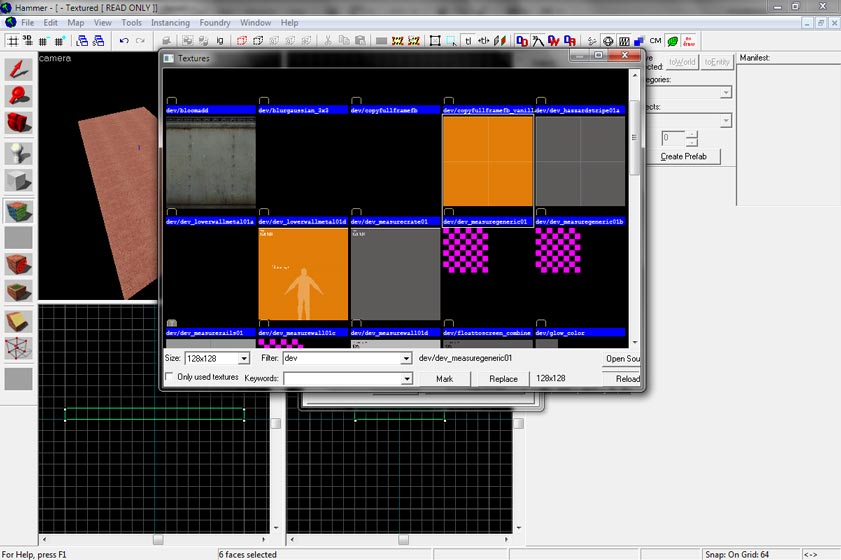
In this window you can search for textures. When it comes to textures there are two kinds of textures: The ones that you will see in game and the ones that are invisible in game but you can see in the editor. For this block we will use a texture that you see in game as well as in the editor. I chose the dev_measuregeneric01. It is a developer texture that has a simple color and shows measuring units. In order to find this texture you should use the Filter option on the bottom of the screen. Just type in dev for this texture.
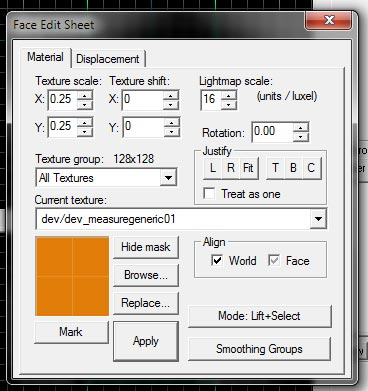
So select dev_measuregeneric01 with a doubleclick. The window will close and throw you back to the previous window. Check if the orange texture is in the small preview window and the click Apply. The new texture should now be on the whole brush. If it is not, then your brush was not selected before you entered the texture tool.
Select your brush, rightclick it in any of the 2D views and chose Make Hollow. Enter -32 and click Okay. This will make your brush hollow and leave you with four smaller brushes. These brushes are now grouped. In order to select one piece of the block only and not the whole room we need to ungroup the created brush. You can either rightclick the selected brush and choose Ungroup or press Ctrl + U. Click outside of your brush to desellect all brushes. The click the top of the brush in the 3D view and press Delete.
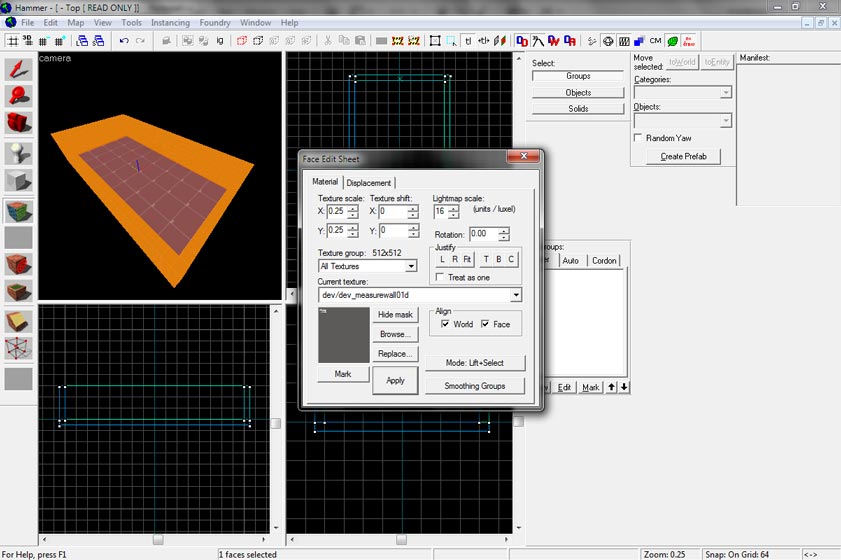
As the brush looks nothing like a map you should first make some texture adjustments. Open the texture tool. With the texture tool open click on the bottom of your brush. Only the bottom, and make sure the texture tool is open. You will now see that your bottom is slightly more red than the other sides of the cube. Select Browse and select the dev_measurewall01d with a doubleclick. Click Apply to apply the texture to the selected bottom. You will see this:
Alien Swarm does something different from other Source Games. Due to the third person perspective you will look a lot at the top of walls. Good thing we removed the roof already otherwise we would look at roofs and that would not be fun at all. Since the top of the walls are boring areas it is needed to blacken them out with the second type of texture. Those that you see in the editor but you will not see in-game. Open the texture tool if you closed it otherwise leave it open. The following action will train your skills: You have four walls and each wall has one top. Select one topside of any wall in the 3d view with the texture tool open. Hold ctrl as you select all the other top faces of these walls. You can release ctrl as long as you do not mark anything else. For example you would release ctrl, then push z to adjust your camera in 3d view, push z to leave the camera and then push ctrl and hold it to select the next face. With all four faces selected click on Browse in the texture tool. Use the Filter to search for nolight and select the toolsnolight texture with a doubleclick. Then apply the texture to the marked faces by clicking Apply. Note that you could also have selected one face after the other and apply the texture separately.
Before applying textures you have to do two things to have the map look like this:
Adding a player
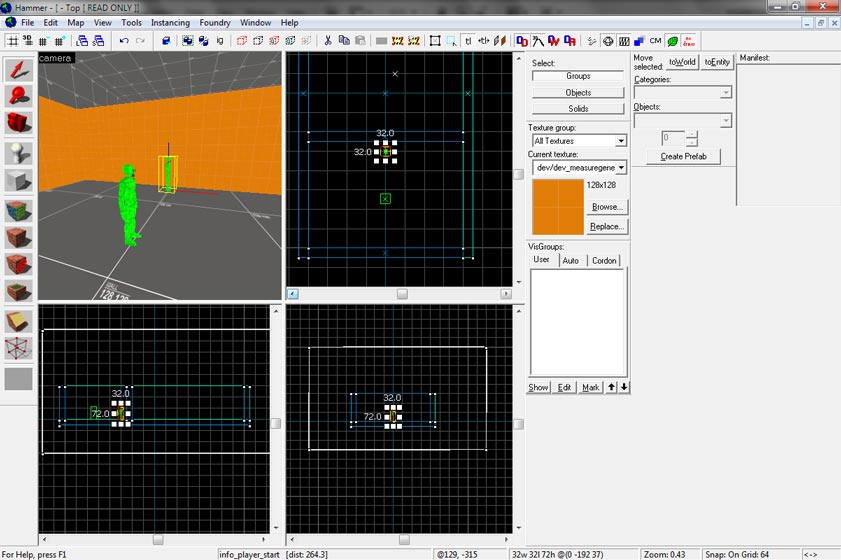
Click on the entity tool and then click inside your box in the 3d view. It will create the standard entity, which is a info_player_start and the starting position of the player. If you want you can rightclick the selected entity with the selection tool and choose Properties at the very bottom of the dropdown menu. In the top right of the window that opens up you will have a black circle with some kind of radar in it. Next to it is a field with a 0 in it. You can adjust your players direction with numbers from 0 to 359 (well, 360 degrees kind of is 0 again) or by dragging the white line in the radar. Click Apply and close the window when you are done.
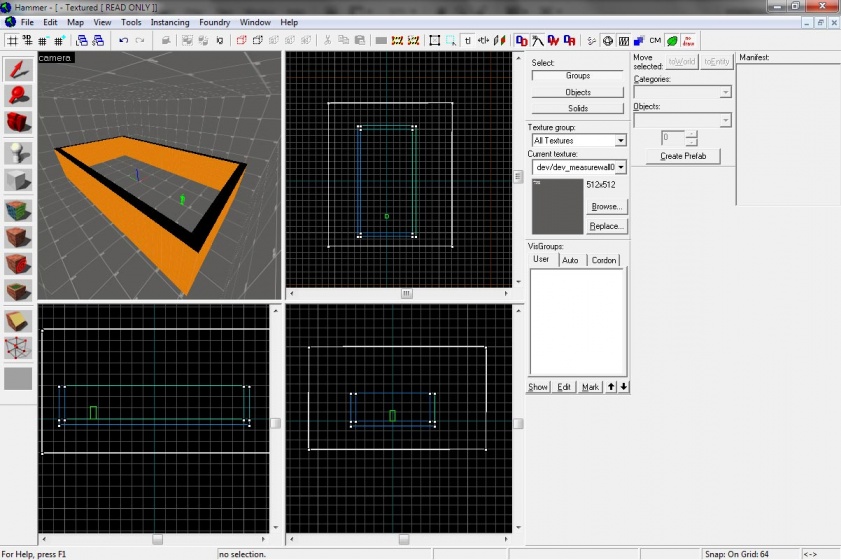
Select the block tool and drag a really huge box in top view around the box we already have. If you want to zoom out on your top view, now is the time to use the mousewheel. Before you create the box check the side and front views to adjust the height of the box. Make sure it captures the box we already have and is about 3 times bigger. Then hit enter or rightclick the white dotted box and select Create Object. Without clicking anything else, click the selection tool. This way you will instantly select the new box. Rightclick the new box on any 2d view and select Make Hollow enter -4 and click Okay.
Now select the new box, it will become slightly red, then select the texture tool and apply the dev_measurewall01d texture.
Now we can go back to texturing the rest of the first cube:
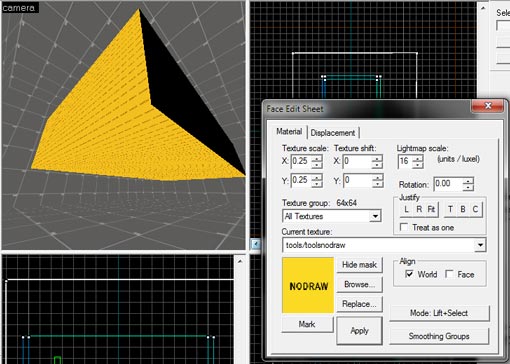
This is what we want. Every outer face of the cube has been textured with toolsnolight. The bottom and the back of the cube can be textured in toolsnodraw. The toolsnodraw texture is a texture that will not show up in game. The difference between NoDraw and NoLight is that NoDraw is invisible, while NoLight absorbs light and therefore becomes a clearly visible as solid black texture. As the player will definitely see the front of the level NoLight will be used there. He might see the sides of the box so it is suggested to use NoLight there as well. The player will (hopefully) never see the bottom and the back of the map so use a NoDraw texture here.
Adding a functional door
To keep things basic and give you a glimpse of everything here we will include a door with a basic trigger. Use the selection tool to select the info player start which looks like a green Gordon Freeman. We placed that earlier. Then us the top view and drag it while holding shift then release the mouse and then release the shift button. This way you will copy the object. Do the same with the front wall. The wall that you dragged into the middle of your room might need an orange texture on one side. Apply that.
Now select the copy-Gordon Freeman and rightclick it in 2d view and select Properties.
The door
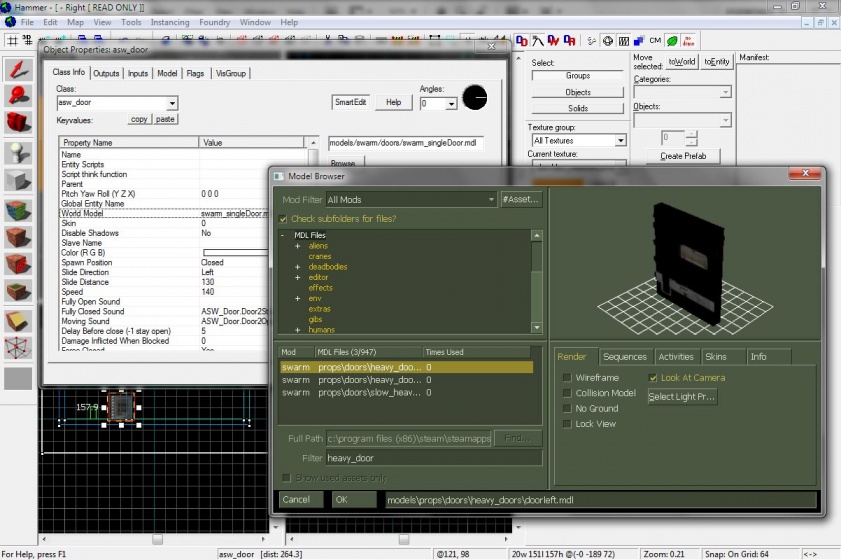
Change the class to asw_door (Asw door) and click Apply. This way our info player start will become a door. Select World Model choose Browse and then use the Filter and enter heavy_door while having the MDL Files selected in the top left. This way you will search all the folders - which means all models. Select the doorleft.mdl click OK. Name the asw_door (which is just the class) by clicking on Name and enter door1. Before you close the properties window adjust the direction of the door so that the bolts face left. You do this by entering numbers like 90, 180, 270, 0 in the top right. Click Apply and close the Properties window.
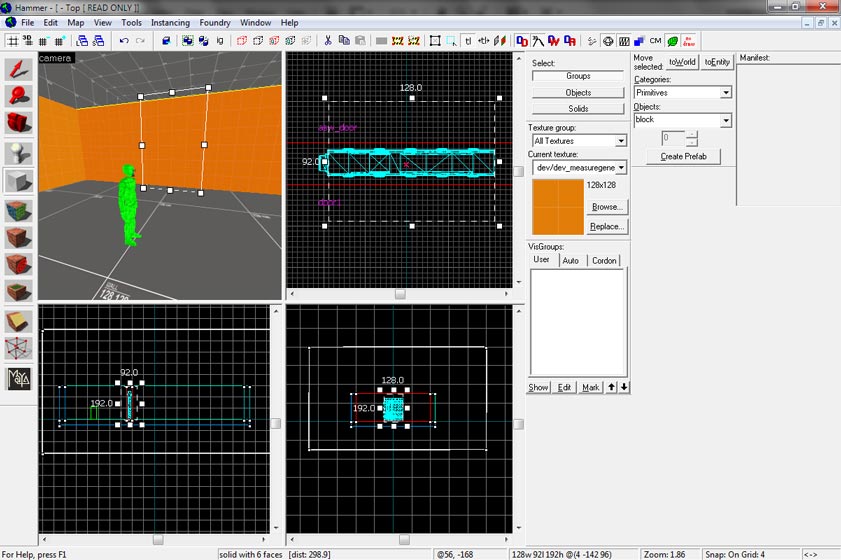
Drag the door into the middle of the wall that sits in the middle of your room. Make sure it is aligned with the floor in the side or front view, It actually should be since the info player start was aligned with the floor. Adjust the gridsize so that the door sits right in the wall and does not stick out anywhere. Also make sure that the wall in the middle is only slightly higher than the door. Then select the middle wall. Click the block tool and drag a block like this in top view:
With the wall previously selected it will use the height of this wall for the new block - because in top view you cannot instantly give a value for the height. Make sure the new box has exactly the same dimensions as on the screenshot. It should slightly touch the door on one side and cut through the bolts on the other. Create the object by hitting enter and the rightclick it and select Carve. Carving will delete anything in the objects way - except entities. Which is a good thing since we want to keep the door and just get rid of the extra wall blocking our door. Delete the box that you used to carve with and you should be left with a door sitting between two walls. Perfect.
The trigger
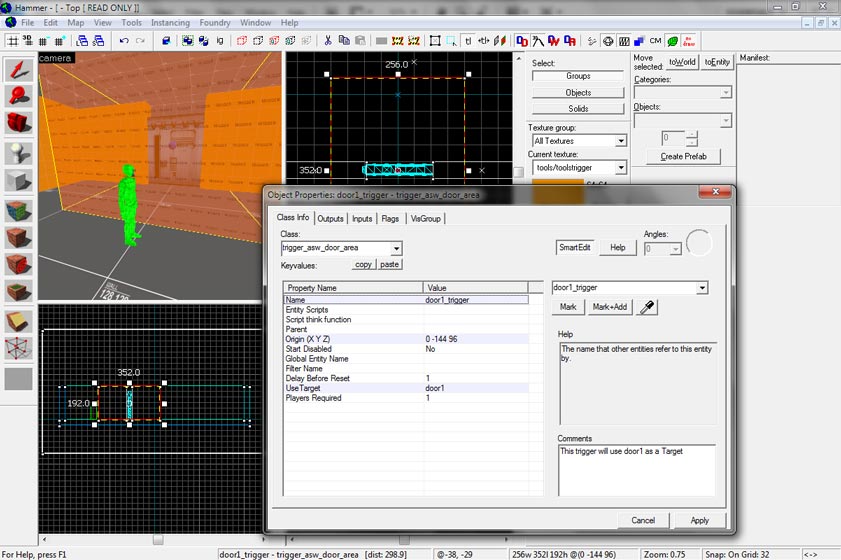
To open the door we will need a trigger area. Which means whenever a player walks into this area the door1 will be triggered to open. For this create a new box in the size of the area that you desire.
The trigger brush has about the same dimension in every direction of the door since we want to open the door from either side. Apply a texture called toolstrigger to the whole box. The box should have the height of the door! Then rightclick the triggerbox and select Tie to Entity or press ctrl + t. This way the box is now some kind of entity that can carry more options than just mere dimensions and a texture. Edit Class to trigger asw door area Edit Name to door1_trigger This way you will know that this trigger belongs to door1. Every door would need a new trigger and a new doorname. Edit Use Target to door1 This way the trigger will know which door to affect. Every object that you want to refer to from another object will need a unique name. That is why the door has been named door1. You do not need to name every lightbulb in the universe, but name the doors.
Click Apply and the door is done.
Lights
For lights you can just copy the info player start entity again or create a new one using the entity tool. Rightclick the new entity Gordon and change the class to light. Note that there are different classes for light. light dynamic for example uses more resources but can do more things than just glow. For our tutorial we keep it simple and use the simple light. Change the color to something grey by clicking on Brightness and then Pick color. The first three numbers correspond to the color's RGB values, respectively, and the last value refers to the light's intensity. If you leave it white the light will be superbright and you will not see anything in game.
Make sure the lights hang about one and a half times as high as your character and place one every few meters.
Objectives
As we only have one player on the map and we want to keep it simple we will use a simple Escape Objective. Which means that whoever survives this difficult map enters a certain area and escapes the infestation. You guess right. The area will be a trigger again. so make a brush / block in the second room at the wall. Apply the toolstrigger texture.
Before we edit this trigger we will need an entity that defines the map objective. Create an entity and change the class to: asw objective escape also name this entity map_objective because we will refer to it in the trigger. The position of this entity does not matter at all. I usually keep them either close to the trigger they will be used with or at some place on the map where I gather a lot of map-defining entities.
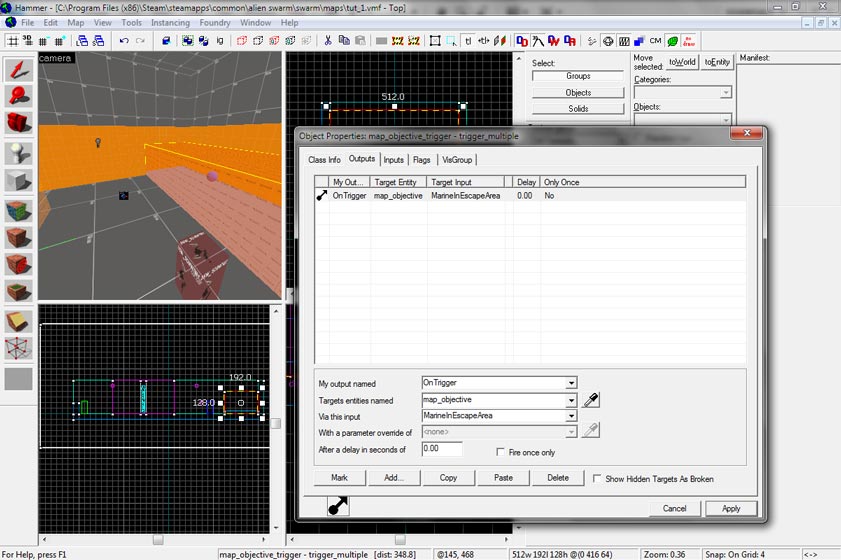
Select the trigger and push ctrl + t or rightclick and then select Tie to Entity. Change the class of the trigger to trigger multiple which is a trigger that can be triggered more than once as opposed to trigger once. Name it map_objective_trigger (you see the concept in naming things right?) Then click on Outputs and Add a new one.
Use these settings:
- My output named: OnTrigger
- Target entities named: map_objective
- Via this input: MarineInEscapeArea
This is your map objective.
Spawning aliens
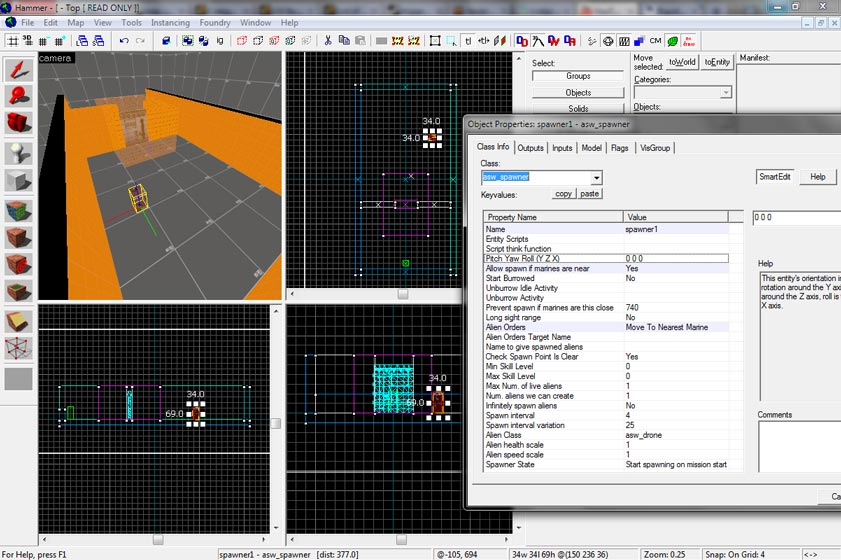
To spawn an alien we keep things simple. Create an entity, make it a class asw spawner. You can name it spawner1 but since we will not refer to it you do not have to name this one. Change Allow spawn if Marines are near to Yes since our map is not very large and we might be very close to the aliens spawn point. Change Alien Orders to Move to nearest Marine Everything else can use default options here. It will spawn only one unit (Num of aliens we can create = 1) but that is enough for now. The asw spawner class is pretty self explanatory so feel free to experiment later.
Adding a structure_seal
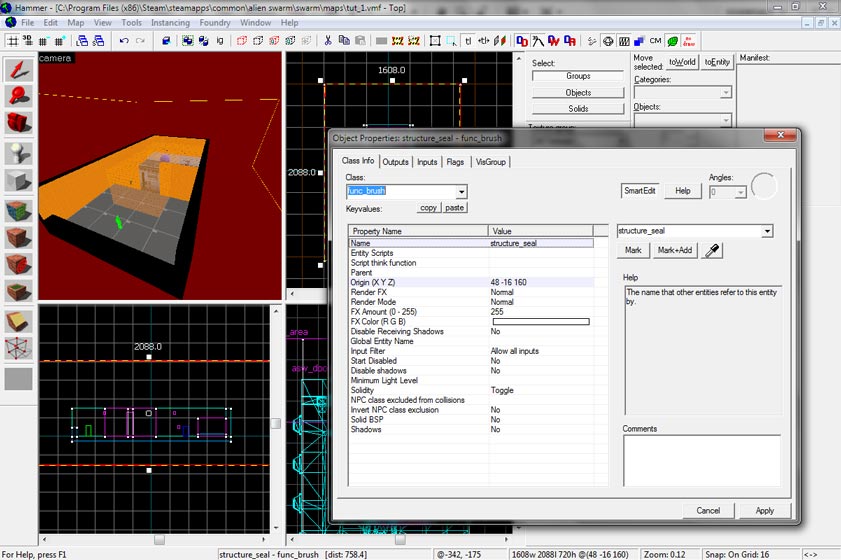
It is time that we bring the black back into the light. Select this hollowed box and apply the toolsnolight texture. Tie to Entity or push ctrl + t and change the class of this brush entity to func_brush. While you can define every name in the map as you like, this one is defined! Name this func_brush to structure_seal
Here is a screenshot:
This box is needed so you have an ending structure around your level. Otherwise it would be endless in every dimension (depending on how much time you have it still is endless on the 4th dimension). If you do not have this structure around every other object on your map your map will "leak". This means you will have parts of your map dripping out of your computer. No, it means you will get an error when compiling. And nobody likes errors.
Checklist and last adjustments
Run a checklist in your mind before you compile the map. It helps avoiding obvious errors
- Do I have a structure_seal?
- Are there lights on my map or will I be blind?
- Do I have a player spawn position?
- Does my player spawn on a solid ground?
- Are all my floors and walls textured?
Compiling the map
This part is easy. Push F9 or go to File -> Run Map. To successfully compile Alien Swarm maps, you'll need to press the button labeled "Expert...", which brings up the Advanced compile settings. In this mode, there is one command in particular that has been added that will allow Alien Swarm maps to compile called -alldetail. -alldetail turns all world brushes into func_detail except for any func_brush entities that have "structure_seal" as their name.
If you see red or yellow lines during compiling something went wrong. You can activate that you have to push a key after compiling to close the compile process and check for the errors. Some of them are easy to understand. Some. In this case you would not want to start the game after compiling. So tick that option.
It might be useful to save the map in this folder: .\steamapps\common\alienswarm\swarm\maps\
Download the tutorial map
- Github version, with .vmf and .bsp files
