Converting Destinations
< SteamVR | Environments
Jump to navigation
Jump to search
This article has no  links to other VDC articles. Please help improve this article by adding links
  that are relevant to the context within the existing text.
January 2024
January 2024
Bringing your Destination into SteamVR Home
In this tutorial, we will walk through this process of bringing your Destination into the SteamVR Workshop - giving everyone access from SteamVR Home.
1. Copy your addon from Destinations to SteamVR
- Find your addon's content folder from Destinations. It should be in: \Steam\steamapps\common\Destinations\content\steamtours_addons
- Find your addon's source content folder for SteamVR. It should be in: \Steam\steamapps\common\SteamVR\tools\steamvr_environments\content\steamtours_addons
- Copy the source content folder for your map (should have the same name as your addon) from Destinations to SteamVR.
- Now find your addon's game content folder from Destinations. This will should in: \Steam\steamapps\common\Destinations\game\steamtours_addons
- Find the corresponding folder for SteamVR. This should be in: \Steam\steamapps\common\SteamVR\tools\steamvr_environments\game\steamtours_addons
- Copy your compiled game content folder from Destinations to SteamVR.
2. Launch SteamVR Workshop Tools
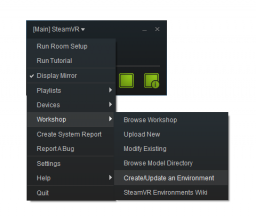
- This can be accessed from the SteamVR window menu > Workshop > Create/Modify an Environment.
- You will be able to select your addon from the list, if everything is copied over correctly.
- Click on Launch Tools.
- From this point on, things should operate in a manner very similar to the Destinations Tools.
- When opening your vmap in Hammer, make sure you are loading the version from SteamVR's content folder!
3. Update Lighting Entities
- The lighting system has been substantially upgraded - however, this means a few changes are necessary to photogrammetry-based maps.
- You will need to change any env_cubemap_box entities to env_combined_light_probe_volume. This can be done by selecting the entity in the 3D view then, in the Object Properties pane to the right, type in 'env_combined_light_probe_volume' and press return. Changing type like this should preserve all cubemap box projection bounds.
- You will likely want to enable 'Calculate Diffuse Lighting Using Cubemap' on the light probe entities for Destinations-style ambient lighting on dynamic objects in photogrammetry scenes.
- Cubemaps will now be built automatically when you rebake lighting.
- Now should now place a light_importance_volume entity in the centre of your map. Extend the bounds to include navigable areas of your map. (The effect is minor for photogrammetry scenes.)
In the Baked Lighting menu at the top of the window, click Bake All Lighting. This will bring up a window showing progress - this will likely take a few minutes. If it's taking significantly longer, check your light_importance_volume entity bounds.
- Now save your map!
- Do a full compile of the map to make sure everything is correct for the SteamVR version of the engine. (An issue with compiling large photogrammetry maps has now been fixed.)
- Once your map is rebuilt, test in VR to make sure everything looks correct.
4. Additional Changes
- The standard shader's cubemap reflections have changed slightly; they will be a little brighter and sharper than before. They are also configurable outside of the Reflectivity and Gloss terms - if you are using this shader feature, adjust the Cube Map Brightness and Blur settings to taste.
- For non-photogrammetry map lighting, the light_environment entity has gained some new features. The cascade shadows are now configurable - defaults should be reasonably sane, but extras will be documented shortly. There is also the ability to bake simple ambient occlusion into vertex lighting on world geometry and even use image-based lighting for ambient light from a skybox texture. Again, this will be documented more fully - as a visual demonstration, look at the new SteamVR home map to see these features in action.
5. Submit Your Map to SteamVR
- Once you are ready to submit your environment to the SteamVR Workshop, build your map (by hitting F9 in Hammer)
- Submit your map to the SteamVR workshop by clicking the Workshop button in the Asset browser.

